Friday, 28 October 2011

Bespoke lampshades

Ever since the Make Lounge started a class on how to make lampshades I'd been dying to make my own. Sadly our previous house didn't have any light fittings that would accommodate a lampshade. Our new Bristolian home however, does have 3 rooms which were in *desperate need* of bespoke lampshades!

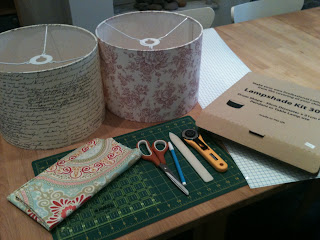
I bought three kits and some fabric from the Make Lounge just before leaving London. And as soon as we had enough moving boxes unpacked to take the guilt away, hubby and I set off to make our lampshades.


The kit comes with everything you need, the metal frame, the backing panel, the tape, the tools. All you need is some basic crafting tools like scissors, a cutting mat, a ruler... It is also handy to have an extra pair of hands at the ready for some of the making process. The good thing about that is that for once, hubby and I could enjoy a crafting activity together. And yes, he truly did enjoy making our lampshades!

So here they are in their full glory:

English flowers for my hobby room
A more studious look for hubby's office

My favourite, the bedroom one

Tuesday, 25 October 2011

Goodbye London, hello Bristol!

In early January of 2003, I packed up my life in Belgium to move to London and never looked back.

The UK has always given me this sense of belonging that no other country ever did. When I first moved over here, London was offering me all I could have ever wanted and more. Some eight plus years later, I'm still fascinated by this wonderful city. There have been days when I have felt tired of London but all in all, I never got bored. In fact, I can honestly say I've had the best time of my life so far in London.

But life moves on, circumstances change and there comes a time when one needs to make difficult choices. For me that means it was time to leave wonderful London to start a new chapter in Bristol.

Why Bristol? Well, the West Country is without a doubt my favourite region of the UK. The landscapes are beautiful and the people are just lovely. To hubby's despair, I'm a very urban person so as idyllic as it sounds, you won't get me living in a cottage in the middle of the British countryside. Bristol is a really nice city, with a bit of life to it and still within reasonable reach of London.

What really sealed the deal for us was finding a house which has a proper shed/workshop for hubby and a hobby room for me! I've spent quite a bit of time setting up my room and I love it. In fact, I love the whole house. We're not fully unpacked yet but somehow it feels really homely.

All I'm hoping now is that Bristol will live up to my expectations. It's still early days and I still have to find my marks but so far, so good.

I'll be posting pictures of my hobby room very soon so keep checking in!

Sunday, 9 October 2011

The long awaited slippers


When I first started felting, I promised hubby I'd make him a pair of felted slippers. That was about 3 years ago and he still didn't have his slippers. Other projects just kept taking priority. I tried to make up for it by buying him a pair of sheepskin slippers last year but once in a while, I'd still get reminded of my promise.

With his birthday coming up and my running out of gift ideas, I figured it was time to make him his long awaited slippers. When I made that promise years ago, I'd planned to hand felt the slippers from roving wool. But after discovering the Wash & Filz It yarn earlier this year, I decided to experiment with that instead. 

The trick with machine felting of course is that you have very little control over the felting process and thus very little control over the finished size of your creation. I found a Drops Design knitting pattern on Ravelry and I just had to trust that my wool would shrink just enough to fit hubby's feet. During felting, the wool shrinks by 30 to 40% so the pre-felting knitted slippers looked ridiculously big. Just to give you an idea, here's a couple of pics with the knitted slippers against a sheet of A4.


Once I'd finished knitting and assembling the slippers, I anxiously tossed them in the washing machine. I put them on a regular programme at 40°C. When they came out, I had a slight moment of panic as the slippers I pulled out were tiny, almost my size! But I know that felt can easily be stretched and moulded into shape while it is still wet and luckily for me, I'd bought a pair of polystyrene foot lasts in hubby's size when I made that fateful promise years ago.

After a bit of pulling and stretching, I got the slippers to just fit on the lasts (picture at the top). I left them to dry on the radiator for a day before adding a final touch. Felt on wooden floors is very slippery so it's best to add a bit of grip to the soles. I used different colours so that it would be simple to remember which is right and which is left. In time, the slippers will mould around his feet and it should be easy to tell then but in the beginning, a touch of colour will make it straightforward enough.


I am pleased to say that the slippers were an instant hit with hubby. In fact, they've become almost inseparable! And they were so easy to make, I think more of them will find their way in my Christmas gifts...

Monday, 3 October 2011

Chihuahua fever

My best friend lives far away, in Quebec to be precise. That means I don't get to see her as often as I would like to. But she's still my favourite friend and when it's her birthday, I want to make it a little bit special, in my own way.

This year I came across the Chi-Chi Fever pattern from Sublime Stitching whilst browsing in a shop and I instantly knew what I would be making for my girl. Did I mention she owns a chihuahua?


I decided to make a bag based on an Amy Butler pattern and embroider the chihuahuas on the main panels. I picked this pattern because it's a good size bag and because Amy Butler patterns are really easy to read.

Embroidering is still very new to me so I was taking a bit of a risk but it turned out all right. I didn't do any really fancy stitches just a simple split stitch along the main lines, a satin stitch on those areas I wanted to fill and then I made an attempt at French knots for the beads of the necklace.


It would have been better if I'd split the stranded cotton so the lines wouldn't look so thick. I also suspect that it would have made the detail work somewhat easier. But I didn't know at the time that you actually could/were supposed to split your thread. Practice and learn, I guess!

I really like the Amy Buttler pattern though. As expected, the instructions were clear and really easy to follow. If you use the fabrics and interfacing that she recommends, it makes for a very sturdy bag with a very professional finish.

All I needed to add was a little personal touch that would put my trademark on it and make it a wee bit more unique for the recipient.

It took longer than I thought to arrive to destination, in fact, I was starting to wonder whether it had gone lost in transit, but it's now safely in the hands of my friend and she loved it. Her husband actually thought I'd had it made! Now how flattering is that?!