Showing posts with label upcycling. Show all posts

Saturday, 2 August 2014

Week 31: A t-shirt dress tutorial

It's been a great week. If only because I managed to make a second t-shirt dress and take enough pictures to write a tutorial. So here it is:

1. I've used a £2.50 t-shirt from Next. I measured on my daughter where her waist was and added a 1.5cm seam allowance. Before cutting, I put a strip of iron-on interfacing to stabilise the fabric.

 2. I used the whole width of my fabric but measured the length of skirt I needed + 7cm of seam allowance. I then folded 2 cm at the top of the fabric and pressed it then repeated the operation. This folded edge will become the gutter in which to insert an elastic.
 3. I stitched my gutter as close to the bottom edge as possible.
 4. I measured a piece of sewing elastic to be roughly the same size as the cut edge of the t-shirt. To insert the elastic in the gutter, I tape it to the end of knitting needle and push it through.
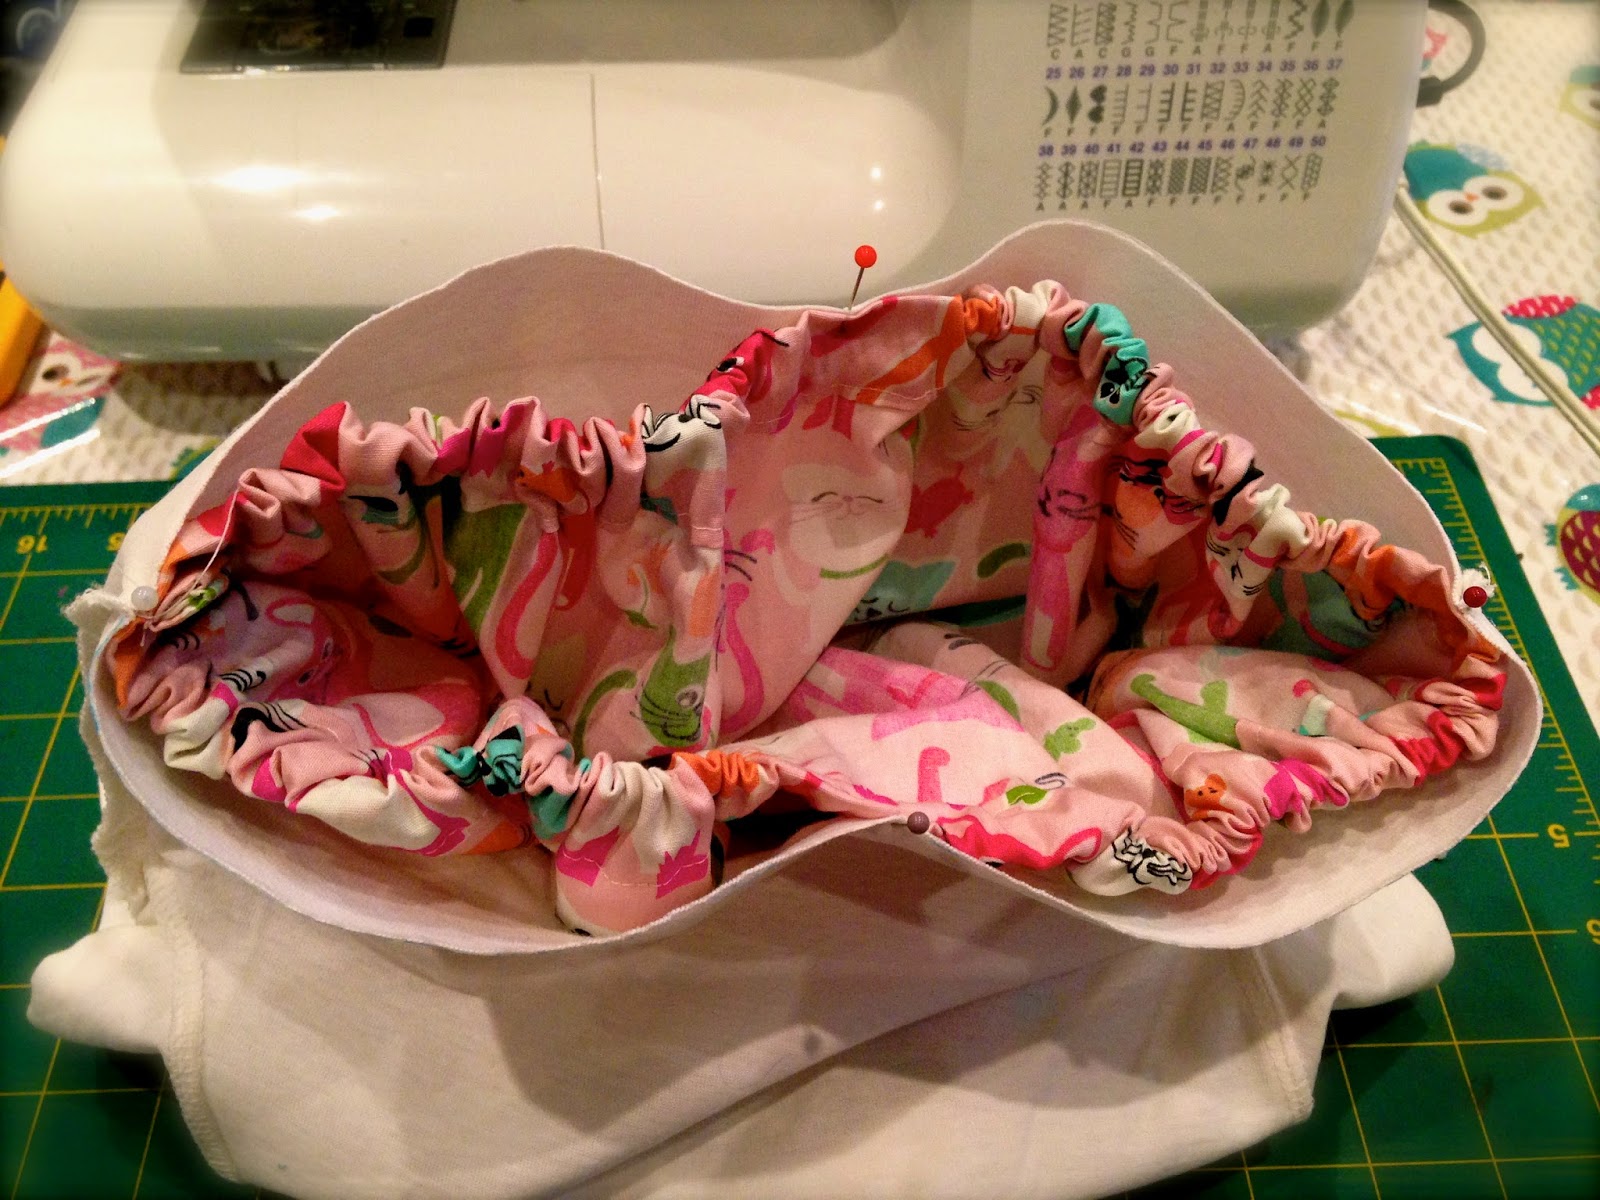
 5. Once you have inserted the elastic, pin it in place so it is flush with the raw edges of the fabric and as close to the seam you just made as possible.
6. I've used a French seam for this skirt, they're meant to be stronger for children's clothes. So, if you're new to a French seam, what you do is make a small seam (0.5cm) with the wrong sides of the fabric together.
 7. You then turn your fabric inside out and do a larger seam (1cm) with the right sides together. That means there should be no raw edges showing on your seam.
 8. By using this seam, the elastic will have been trapped twice in the seam as well.
 9. At this stage, the skirt part is nearly done. You could just seam the bottom and use it as it is but as we're making a t-shirt dress, there's a few more steps for you to follow.
10. Mark the 4 cardinal points of you skirt with pins, so the two edges and the two middle points.
 11. Do the same with your t-shirt and match them up, right sides together.
 12. Pin the hell out of it so it won't shift when you're stitching it. While pinning, try and push the elastic towards the seam so it doesn't catch when you're stitching the skirt to the t-shirt and create bulky seams.
 13. It's time to attach the two pieces together. I find it easier to have the t-shirt underneath so you have a smooth surface to "glide" on and you can keep an eye on the gathering of the skirt.
 14. Finally, all that's left is to seam the bottom of the skirt. I've used a 1.5 cm seam folded and pressed twice.
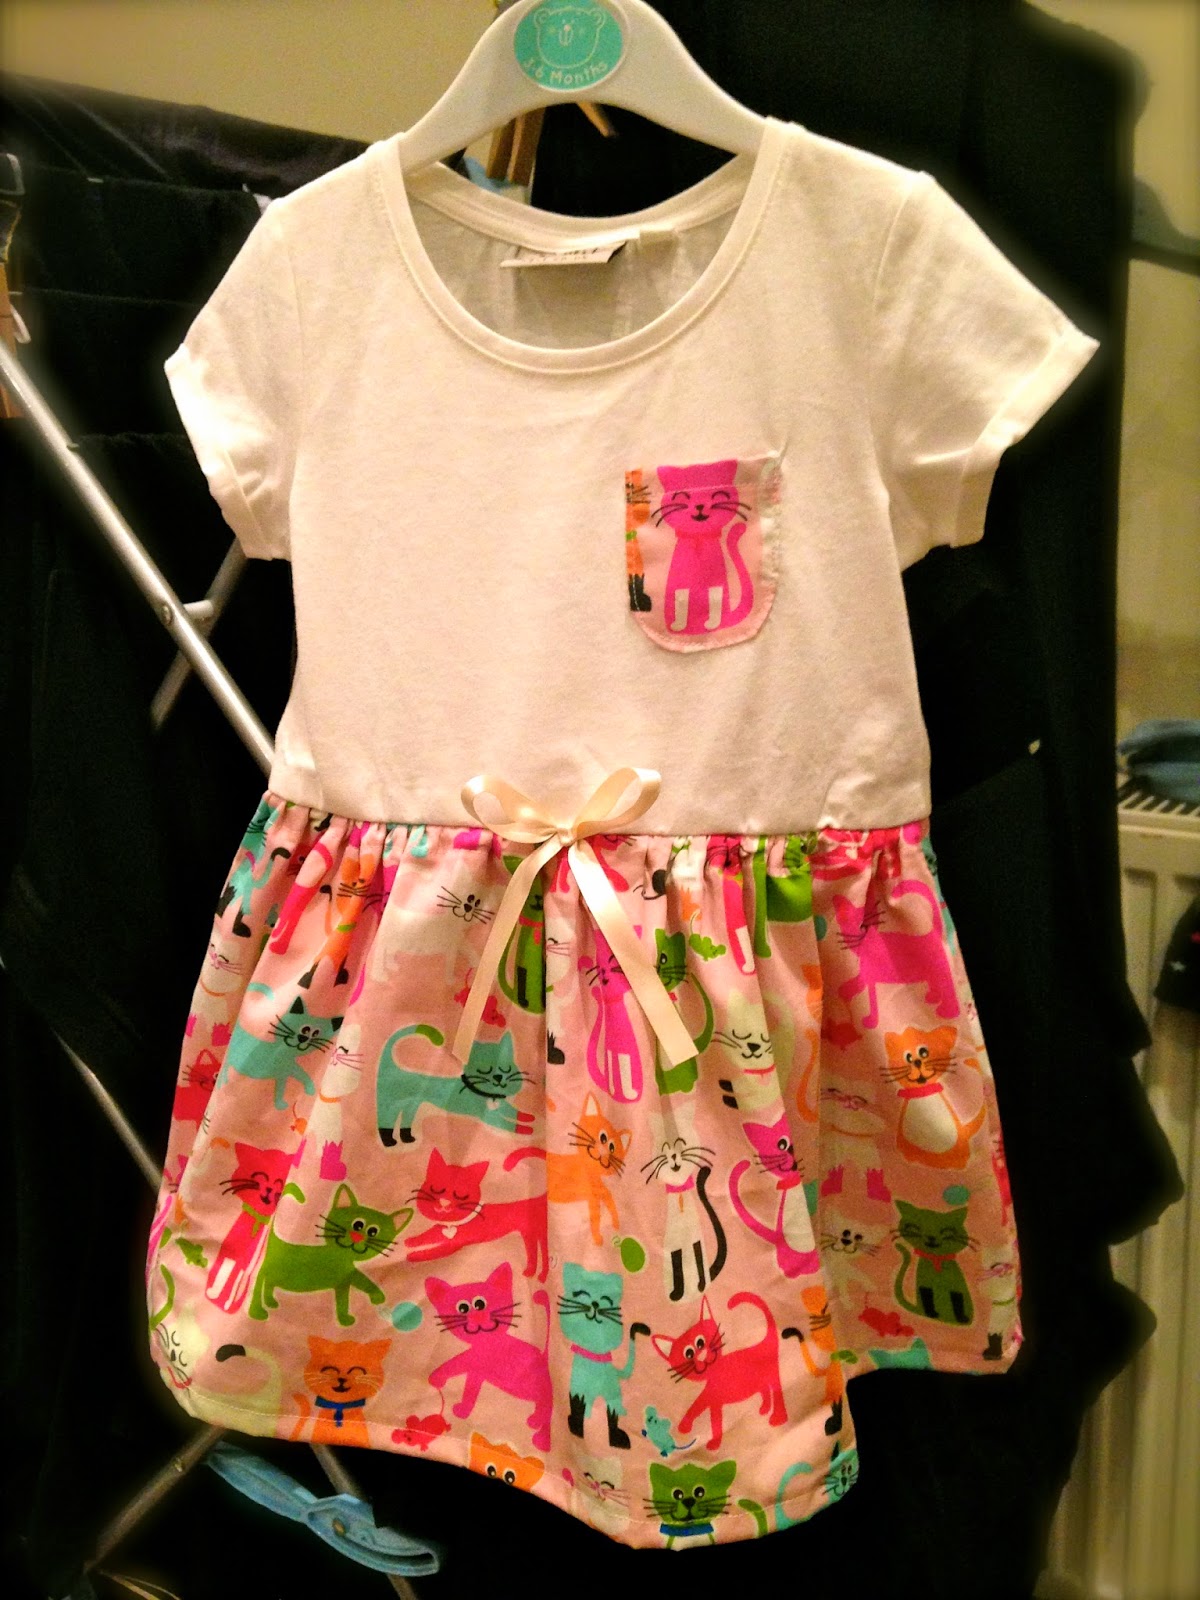
 15. Et voilà, you have made a t-shirt dress! Well done you!
 16. I've added a couple of finishing touches to mine. A pretty little ribbon at the front of the skirt and a a chest pocket. Not mandatory, but they're pretty.

My daughter was so excited to see her dress in the morning, she practically begged me to put it on. She then ran to the mirror to admire herself. Look at that proud grin! It made it so worthwhile!


I hope you enjoyed this tutorial. If you have any questions, feel free to ask!

Sunday, 27 July 2014

Week 30: Maxi dress, mini dress

As my clients have more or less all gone on holiday, it's been eerily quiet on the work front. That means I've finally had some prime crafting time and that makes me so happy!

I'm on the short side, but just not quite short enough to fit into most stores' petite range so I often find myself having to shorten newly bought clothes, the worst offenders being trousers and long skirts. I've recently purchased a really beautiful, allbeit simple, maxi-dress which needed shortening by a good 4 inches. I'm glad to report that is now done and I'm very much looking forward to wearing my dress. 


A little while ago, I came across a fab online tutorial on how to make a t-shirt dress for a toddler. I have tons of small length (50cm-1m) of really pretty lovely fabric in my stash and this seemed like a great way to use some up. I've bought a small selection of £2.50 t-shirts from Next and paired them with some of the fabrics I had. All I needed was some free time to make the t-shirt dresses.

I had in mind to turn my efforts into my very own tutorial (I haven't exactly followed the one mentioned above) but I got a little carried away and forgot to take pictures along the way. Never mind, as the first attempt was a roaring success, I'll be making a couple more this week and I'll use those as a tutorial for you lovely readers.


All in all, not counting my time obviously, I reckon this little t-shirt dress cost me less than £10 to make. Pretty good value for a one-of-a-kind item, non?

I can also say that it fits my daughter perfectly but she was too wriggly for me to take a decent picture. Maybe in one of the next dresses. Something for you to look forward to next week :-)

Sunday, 15 June 2014

Week 23 & 24: Baking for the win

I wasn't able to post last week as we had friends over for the weekend and I didn't want to be a poor hostess, spending more time behind my laptop than talking to my guests. To be fair, it would have been a short update anyway as work took up a lot of my time so it works out well having this update covering two weeks. 

Among our visiting friends was a birthday girl, so naturally we had to bake her a cake. One of my favourite cakes ever is the traditional red velvet. I know it's wrong, all that colouring just can't be good for you, but I really like the taste of it and the dramatic effect when you cut through it. The weekend before, Simon Rimmer was presenting his version of the red velvet cake on Sunday Brunch (Channel 4) so I thought I'd try his recipe. As I was making it, I couldn't help but feel the proportions were all wrong. The cake came out looking ok but when I tasted it, I was quite disappointed. It was quite dense and quite dry, not at all what I'd want from a red velvet. In saying that, it was perfectly edible and our birthday girl loved it but in our household, baking is a skill and we're pretty critical. I certainly won't be using this recipe again. 


While I was baking a cake, hubby did what he does best and baked a bread, but not just any bread, a "Fries Suikerbrood" otherwise known in English as a Frisian sugar bread. I used to have a craving for these during pregnancy but we hadn't made any since. As you can imagine, this is loaded with calories but it is oh so moorish and delicious! Especially when made by the master baker himself.

I mentioned in my previous update that I was preparing for a baking competition. Well, the time came this week. I can't remember if I've said before that I'm a member of the WI but this was our local WI's bake off. I'd planned to put in two entries: red velvet cake pops in the shape of apples and the rhubarb and custard cake I'd been practising. As there was a category for jams and chutneys, I made the last minute decision to enter a pot of the grapefruit marmalade I made a few weeks back.

The baking prep actually started with some... painting. I knew how I wanted to present my cake pops and I'd gotten these flower pot shaped holders online but they needed a touch of colour so I spent an entire evening experimenting with watercolours then building up the layers until I had the result I wanted.


The following day/evening, I baked and decorated my cake pops. As experimenting with a new recipe hadn't paid off, I went back to my old and trusted red velvet recipe. I reduced the cocoa content and increased the red colouring slightly for effect and everything turned out perfectly. It was a hot day however and the candy melt coating gave me an awful lot of grief. I'd planned on making red and green apples but I messed up the red candy melt so badly it became unworkable and I was left with just the green. Looking back, it probably wasn't such a bad thing, the effect of biting in an apple green pop to discover a bright red cake inside was really quite dramatic.

On the day of the competition, I bought a load of organic rhubarb, the pinkest, prettiest one I could find and set to work making custard and baking my best ever cake. After I'd finished, I was left with quite a lot of the pink stuff and just enough time to spare to bake another entry, so a rhubarb crumble traybake made it into the oven.

As I displayed my entries and looked at what I was up against, I hoped I'd get at least one prize (runner up was good enough) and that none of my entries qualified for the "epic fail" (good effort but didn't quite hit the mark) prize.


But I didn't win just one prize, I won three! OK, so clearly the jury wasn't as enamoured as I am with rhubarb because none of my rhubarb bakes got a mention. My cake pops however hit the home run. Not only were they best in their category (Small but Perfectly Formed), they also raked in the "Showstopper" prize which was picked by the jury out of all the entries. I think I did quite a few leaps of joy when my name was called out. The biggest surprise for me though was that my marmalade won the runner up prize. Considering this is only the second time ever that I've tried my hand at jam making and that I didn't actually follow a recipe, that's a fab result and one I'm still pretty chuffed about!

This win means I'm now a bona fide baker in our house and I no longer have to hide in my husband's shadow. We're officially a baking power couple :-)

In other news, I've been playing with plastic beads these past two weeks. I'd seen somewhere that by baking cheap plastic beads for a relatively short time, you can melt them and create accessories. I had a first go and it really worked. I chose to glue the little flowers to hairbands for my daughter but you could easily turn them into rings, brooches or hairclips.


I also had my nails re-done and opted for a 3D design. I'd been oggling those for a while so it was time to give it a go. I was worried I wouldn't be able to stop picking at it but so far I've been really good and a week in, they're still intact.

I'm currently working on a number of yarn based projects but you'll have to wait until next week to find out more. Have a lovely week folks!

Sunday, 1 June 2014

Week 22: rhubarb how I love thee!

I'm happy to report that week 22 was not "blah" like its predecessor but rather... tangy! Tangy like beautiful, delicious, pink rhubarb.

I love spring/early summer, the sun comes out to play, flowers and trees are blooming and my favourite fruits come into season. I also love that it's the season of rhubarb. And this week I've made the most of it, cooking rhubarb in a number of ways. 

First we had rhubarb fools, a quick and easy recipe stolen from Weight Watchers. 

To make these you'll need 450g rhubarb, 1 bag (24g) of raspberry jelly crystals, 200ml of boiling water, 200g of greek yoghurt, 4tbsp of sugar (or sweetener) and a couple of handfuls of porridge oats. Chop the rhubarb. Pour the crystals and water in a pan, once the crystals are dissolved, add the rhubarb. Cover and leave to simmer for 10 minutes, until the rhubarb is tender. Transfer the contents of the pan to a food processor and blitz the whole thing. Leave to cool for a while then add the sugar to taste and the greek yoghurt. Blitz again. Pour in glasses and leave to set. Just before serving, put the oats in a pre-heated oven at 180ºC for about 10 minutes to toast them. Sprinkle on top of the rhubarb fools and enjoy. 

After the fools came the classic combination of rhubarb and custard in the form of a cake. It was a baking experiment, one which I plan to enter in an upcoming baking competition so I won't be sharing my recipe just yet, or much about the cake for that matter. All I'll say is that it's a really good looking cake and it was truly delicious. Hubby and his colleagues got to be the judges of my first attempt. 


Finally, we ended the week with a luscious crumble. I used a James Martin recipe and it turned out perfectly. I only used about half the sugar in the rhubarb mix as I like it tangy and I also used a half flour/half oats mix for the topping. I served it with a dollop of clotted cream ice cream but double cream or custard would have done the trick just fine.


Outside my rhubarb obsession, I have been experimenting with cheap crafts this week. Inspired by a post I saw on Pinterest, I came up with two activities for my toddler.

First I recycled a cardboard box, strengthened it with Duck tape then made a series of holes in it with the help of a scalpel and a knitting needle. Add a (dirt cheap) bag of pipe cleaners and hey presto, hours of fun for the little person, arranging and re-arranging the pipe cleaners in the different holes. Although I must admit, I'm still not sure who had the most fun playing with it, our daughter or her parents.

Next I chopped a cardboard tube in bits of different size and stuck them to the side of a cupboard then I gave our daughter a bowl full of (again, cheap) pompons. She loved chucking the pompons through the tubes and delighted in the watching them fall back in the container. It really doesn't take much to entertain a small person, does it?


I've also explored the latest teenage craze this week, rainbow loom bands. A bag of these bands costs less than £2 at our local store. I've used my knitting loom to make single band bracelets, which was pretty easy. Now I need to find more designs to challenge myself or I'm at risk of quickly losing interest.

That's it from me for this week. Enjoy the sunshine folks x