Monday 26 November 2012

Essential nursery makes

In October and November, most of my creative time and energy has been spent getting the nursery ready. I've finally taken a few pictures of the now finished room so I can tell you all about it. You'll have to excuse my really poor photographic skills though!

We rent our house so we couldn't do too much to the room or its structure. That's when wall stickers come in really handy, they jazz up a room in no time and leave virtually no damage when you have to remove them. I'd fallen in love quite early on with the Jomoval Scroll Tree range so we bought that and on the back of it, agreed on an owl theme for the nursery. The wall sticker comes in 80 or so individual bits so putting it up, while simple, does require a little bit of patience!


To my delight, we've inherited our crib. It actually is the crib my sister and I slept in when we were born and the same crib all my nephews slept in more recently. Of course with the crib being nearly 35 years old, the original lining and draping hasn't survived so I had to make a new one. Without a pattern.  And using elastic, something I haven't done in my sewing adventures so far! 

This is where all my lovely fabrics came in handy though! After a lot of thinking, and calculating, and checking with my other half that I was doing it right (baby brain is a real blight and I can't trust my own judgement at the moment), I've managed to produce something pretty decent. Well I think so anyway! 


Overtime, the crib will get replaced by a cot bed (another inherited item) and I'll have to make a bumper for it but we've got a few months ahead of us for that.

The next step was replacing the curtains and I wanted them lined, to keep most of the light out and most of the heat in. We debated buying another owlie fabric for the curtains but were worried that it might be overkill. With this in mind and in an attempt to limit costs, we eventually decided to use a perfectly good fabric, cream with dark pink polka dots, that was lurking in my stash. I'd originally bought it with the idea of re-upholstering a chair but that same chair has since become the cat's near permanent residence and as her fur is grey and she moults quite badly in the summer, a cream fabric didn't seem like a good plan anymore. 

I had to do a bit of online research to find out which was the best way to make lined curtains but luckily, you can find tutorials for pretty much anything these days. We had a near disaster when baby brain struck and I seamed the wrong end of the lining. I am very grateful for my darling husband who patiently unpicked my mistake stitch by stitch!


The chest of drawers/changing station was also a hand-me down, from hubby's side. We've jazzed it up with more Jomoval wall stickers. 

Having it all laid out and ready makes it all suddenly very real! Overall we're really pleased with the nursery and I really hope our little Goose likes it as much as we do. I'll leave you with a few more pics of the finished room. The gorgeous little cushion on the nursing chair was screen printed by the lovely Helen Rawlinson who teaches at the Make Lounge.


Tuesday 20 November 2012

Dummy clips

With only a few weeks left before "B" day, it's fair to say hubby and I have gone a little baby mad lately.

We've spent a fair amount of time shopping for baby essentials and cute baby outfits. While the dad-to-be has been busy dismantling, painting and re-building the baby furniture we've inherited from our sisters (one of the perks of the being late starters of the family!), I've been washing and tidying away all the baby clothes, packing hospital bags and sewing curtains and crib linings. 

I'm pleased to say that, on target, the nursery was finished before I hit week 34. A post will follow soon once I've remembered to haul myself and the bump up those stairs to take pictures. 

There's been little time left for leisurely crafting. I'm putting the finishing touches to the knitted sleeping bag I started months ago, I still haven't printed all my baby grows and I'm still hoping I'll get to make and finish a bumper and a quilt for our playpen before the due date. 

I have been missing my crafting and my blogging more and more and was getting rather desperate for a quick and easy project. Then my friend Lorna posted a picture of homemade dummy clips on Facebook and I felt instantly inspired. There it was, my quick and easy project! 

I've been making a few of them in the past couple of weeks, improving my design with each one.

The first one was really simple, all that's required is a pretty ribbon, a dummy clip, a popper and basic sewing skills:


Inspired by Lorna's work, I took it a step further and started adding beads, held in place by knotting the ribbon at both ends:


But then I started thinking that it would be nice if the dummy clip had some elasticity to it. However, I didn't want to use an elastic that I would have to knot as I felt that would be too risky to a baby if it unravelled. After a bit of searching, I've found metal free hairbands that are thin enough for me to thread beads on but also sturdy enough to remove the risk of them snapping at the slightest tug. So here's what the design has evolved into:


I'll probably make a few more of those before Baby Goose arrives, one with her name would be nice but since we're keeping it secret, it won't appear on here for a little while ;-). Oh and should you wonder who Alana is, it's my neighbour's gorgeous baby girl and I still need to go and give her that clip! 

Sunday 9 September 2012

Peacock earrings

I've been feeling quite frustrated lately. I have a head full of plans and projects but rarely the energy to match it. I'm also itching to get started on a load of baby makes, especially the nursery, but I have to wait until we've picked up our furniture from my sister's later this month. And we've been told that we're most likely expecting a girl (we are delighted!) but I want to wait for a definite confirmation from a scan in Belgium before committing myself to some gender specific makes.

I've started other projects, a set of screen printed baby grows and a knitted sleeping bag among other things, but I haven't finished any of it yet, meaning I can't blog about it. And so the little blog looks neglected for a while longer.

During one of my many sleepless nights last week, I found myself thinking about one of the pins on my Pinterest jewellery board. Don't ask me why that pin suddenly came to mind, especially as I must have accumulated hundreds of pins on there by now, all I know is that I had to try and replicate it and have spent a few hours lying awake and debating how best to do it.

I have an insane stash of crafty stuff and amongst it, a pile of colour plated wires. I must have bought those with a specific project in mind but as often happens, other projects took precedence and the purpose of the coloured wires has been forgotten. But hey, they were just what I needed for this project, proof that a well stocked stash always comes in handy :-)

After two mornings of wrapping a series of coloured wires around a bead threaded on another piece of gold plated wire, voilà: a pair of peacock feather earrings!


I didn't have any gold plated fishhooks in my stash so I made these myself. I do think the wire I'm using is a bit too soft for fishhooks though so I'll have to buy some proper ones next time I place an order for jewellery supplies.

The earrings look stunning, if I may say so myself, proper showpieces. I'd love to show them off with a nice party frock. But probably not this year, I'm afraid by the time the party season starts, only a tent will fit me!

Sunday 5 August 2012

Gearing up for a lot of baby makes

As we get ever closer to our 20 weeks scan, and by that, the mid-point of my pregnancy, I am more and more itching to make stuff for the baby.

We have settled on a loose "owl" theme for the nursery and I've placed an order for a load of fabrics from Fabric Rehab. I'm hoping to turn those into a baby quilt, a cot bumper, some cushions and whatever else I can think of. Aren't they cute?

Inspired by the Make Lounge and their brilliant screenprinting workshop, I've also ordered a Permaset screen printing kit. Expect some pictures soon of printed baby grows and T-shirts!

I already own a couple of baby knitting and crochet books which I'm really fond of, namely
Crochet for babies and toddlers by Betty Barnden and Baby knits for beginners by Debbie Bliss. Both have great projects in them, really well explained and generally easy to make, I highly recommend them.

I've now ordered a few more books, The ultimate book of baby knits by Debbie Bliss, which I'd been eyeing for some time now as it's full of really beautiful and practical projects and I trust the author, and Cute and easy crocheted baby clothes by Nicky Trench, which I've only just discovered but like a lot already.

I'd also ordered the Big book of baby afghans but promptly decided to return it. I couldn't find one single project in the book that I liked. Every single afghan looked like something that would have been popular when I was born, in the late seventies. It's all a bit frilly and lacy and the stereotypical pastel palette made it even less palatable. It's the first time ever I have returned a book but I really couldn't see any point in keeping this one and couldn't think of anyone that might have liked it instead of me.

Now I just need to find the time to make all these lovely things!

Wednesday 1 August 2012

Granny shawl

Back in April I got fed up from being cold when sat at my desk and I decided I needed a shawl to wrap myself in. After a quick search on Ravelry, I found a pattern that was not only nice and easy but also quite practical as the shape and size of the shawl allows it to double up as a scarf.


After days of debating which colours from my humongous stash I was going to use, and using the random stripe generator to know which order I was going to work the colours in, I took my yarn and my hook to craft night and made a start. The shawl is made in a simple granny stitch so it's really easy. But for some reason, it's taken me this long to finish it. Maybe it's because I started it there but this project only ever seemed to make progress at craft night and we only meet every three weeks for a couple of hours or so. I'm glad I've actually joined two different craft clubs otherwise I fear the shawl would not have been ready for the return of winter! 


Even though the weather has cooled a fair bit, it's too hot at the moment for me to wear my latest creation. I might never get the chance though, my cat is very fond of the new shawl! 


Thursday 26 July 2012

Baby crochet

A few weeks back, a friend of mine gave birth to a gorgeous little baby girl. I think it's the sight of this little bundle of joy that finally got me out of my creative block. 

I did a quick bit of research on Ravelry and found a pattern by Mon Petit Violon for the cutest ever baby booties. I had all the yarn I needed in my stash so I set out to work and pretty much finished the pair in an afternoon. I did take an extra week to stitch in all the ends and attach the flowers though, pure laziness on my part! 


When hubby saw them he asked if they were for ours but as we don't know yet what we're having, I had to disappoint him. If we are expecting a girl, I will definitely make another pair of these... or two... or three... They're just so quick to make and so so cute! 

Baby Florence and her mummy really liked the little booties. Here's a lovely shot of the two of them:


Tuesday 24 July 2012

Floating bracelet and necklace

I really ought to catch up on my blog posts! It's bad enough that I haven't been making as much as I normally would, the little I have made, I just haven't blogged about.

During what will now be referred to as my creativity block, I have experimented with more jewellery kits from the Beadshop. Two of them were for "floating" jewellery. That is bracelets and necklaces where beads just seem to be suspended on a wire. Rather elegant when it's well made.

This is what my experiments looked like:


As always, the kits came with everything you need bar the jewellery pliers.

I do think the result is pretty but the silver coloured wire is a little too visible to my taste. Also, the beads here are secured on the wire with crimps, which of course are visible. I own a similar necklace where the beads aren't secured in that way (I can only assume that they have been glued into place) and I like it better because it really makes it look like the beads are "floating". Ah well, something else to experiment with in the near future... 

Monday 9 July 2012

My biggest project to date

This poor blog has been badly neglected in the past few weeks. I must admit my creativity has been on a long break, reducing the amount of crafting I normally do. But most importantly, my mind has been otherwise engaged with what will probably be one of my biggest craft projects ever... that of making a baby!


Say hello to the WIP (work in progress) at 13 weeks. Yes, I'm pregnant and expecting for the 1st of January, talk about starting the new year with a bang!

For a while, this baby seemed to absorb every ounce of creativity I normally have. Tiredness and morning sickness are probably to blame for a large part of it. Luckily, I think things are starting to look up. Ideas are slowly making a comeback, so much so, I have ordered a bunch of fabrics which will come to good use in the future nursery. You will find me back at the sewing machine in no time!

Tuesday 12 June 2012

Sweet little lamb cake

In our household, hubby is the baker, I'm the cook. But occasionally we join efforts and make something fantastic. Like a winning Christmas dessert. Or a communion cake for my nephew.

It is tradition in Belgium to have a cake (often an ice cream cake) in the shape of a lamb for a first communion. Don't ask me why, I'm not entirely au-fait with Christian customs. But, as my nephew's first communion was approaching, I'd promised my sister that hubby and I would make the cake for her.

After trawling the internet for inspiration, I came across a mould from Wiltons and some suggestions on how to decorate a lamb cake. So I ordered all the equipment and hubby and I did a trial run, about a week before the event. Our first attempt was surprisingly successful.

We picked a red velvet cake as the base but the red colourant clearly wasn't strong enough and once baked, it looked like a plain chocolate cake. A nice, moist, fluffy chocolate cake, mind you! We covered the lamb in butter cream then cut the face and ears out of sugar paste and covered the body in mini marshmallows cut in half (tedious job, I tell you!). I used an edible pen to draw the lamb's face.

We set off to Belgium with all our equipment but just as we were reaching our destination, we realised we'd forgotten to bring the mini marshmallows with us. Drama! especially as they're really not easy to come by in Belgium. After a restless night trying to come up with all sorts of solutions, we set off to a specialist baking shop and found some. The only problem was that they came in bags of mixed colours so on top of having to cut them all in half, we also had to colour sort three bags of mini marshmallows!

The cake alone probably wouldn't have fed all the guests so we set it in the middle of a field of lemon cupcakes which we decorated with green sugarpaste and sugar flowers. The result was really quite cute though I think our trial lamb looked somewhat better.

My nephew was super excited by his cake (and he's not even a sweet tooth!) and the guests really liked it. Here are a few pics which we took on a mobile on the day, so you'll have to excuse the poor quality of the images.


Thursday 7 June 2012

The thing about waffles...

When I was in Belgium over the weekend, I received a belated birthday gift, something I'd been longing for for ages: a waffle iron.

We Belgians love our waffles and we make many different varieties. As soon as I got home, I got cracking with a batch using the family recipe. When I was done, I proudly posted a picture on Facebook and was offended by the comments that came back. "What do you serve with it?" or "Send me some, I already have the ice cream" (sorry Jo and Lizzie!). My waffles are best eaten on their own. In fact most Belgian waffles are! Time for a little lesson.

What Brits and other non-Belgians usually qualify as Belgian waffles are in fact Liège waffles. They're thick and have caramelised lumps of sugar in them. They are best eaten warm. And despite your culinary customs, they are best eaten on their own! Ok, sometimes they are nice dipped in chocolate. But that's as far as we go. In Belgium, Liège waffles are street food, you find them on every corner and they're delicious on a cold winter's day.


The only waffle we Belgians serve with garnish is the Brussels waffle. It's a large, crispy and light waffle. It doesn't have much taste on its own but it is delicious with some fresh strawberries and chantilly cream and/or ice cream.


The waffles I've made are commonly know as Namur waffles. They are made from a cake like batter so they are sweet and tasty and again best eaten on their own. You can eat them warm as they come out of the waffle iron but they are usually stored in a tin and eaten cold as a tea-time snack. Making them brought back one of my best childhood memories. When my grandmother would make waffles, my sister and I would stand at the ready with a teaspoon and we'd sneak behind her back to try and eat as much of the batter as we could. Hubby is a new convert to the delights of waffle batter :-)


The next batch I'm planning to make will be Ardennes waffles. They're not as sweet as the Namur waffles and a whole lot stodgier because they are made with fresh yeast and left to rise before going in the waffle iron. I'm looking forward to it already!

Wednesday 23 May 2012

Memory wire bracelet

It seems I'm going through a patch of crafter's block. It's not that I lack the creative ideas, I have a list as long as my arm of stuff I want to make, but I just don't fancy making any of it. I think I may be suffering from an overdose of textile crafts. I've been knitting and crocheting and sewing an awful lot lately and I've just had enough. So my rose jumper lies abandoned in a corner and the granny shawl has ground to a halt.

Jewellery has always been my biggest crafting love so in an attempt to fight the block and get inspired again, I've dug up a number of jewellery kits I'd bought from The Beadshop a little while back. Kits are a great way to learn new skills and they shouldn't require too much thinking, just what the doctor ordered!

First up is a project I've been eyeing for some time, a memory wire bracelet. The kit comes with everything you might need, bar the jewellery pliers.


The instructions were really simple so I was ready to start in no time. And within 30 minutes, I was finished. I can't believe how easy it is to make. It's literally just a question of making a loop in the wire, stringing the beads and then make a final loop to close it. A great project for selling at craft fairs as it's such a quick make. It does require a fair amount of beads though so it would be worth considering buying them in bulk or wholesale to reduce costs. Here's the finished product:


Tuesday 15 May 2012

The cutest kitten on the block

My beloved Miss Marple turned 14 today. She may be a mature lady now but she was once a very cute, mischievous kitten.

I thought today would be a good day to scan in a few rare images of Miss Marple the day she came to live with me. How could I possibly resist that little face?

Look at that little face! the cutest kitten on the block!

She wasted no time making herself at home

She seduced my dad in a few seconds flat despite him being very much againt having a pet at home

Yes, yes, that's me with the corn rows and sunburnt ears!

Monday 7 May 2012

Baby quilt

You may remember that I had a bit of a fabric splurge the last time I was in London. Some of the fabrics I'd bought were with a baby quilt in mind for my best friend's little boy, born at the end of February in Quebec.

Based on the pictures I'd seen of it on Facebook, I knew the nursery was decorated in subtle tones which is what led me when choosing the colour scheme.

I debated for some time which size quilt to make and which pattern to use. The size was decided on with the help of the mums in my craft club. Apparently, a small quilt is quite handy when out with a pram so I went for 65cm by 90cm. I then made a few drawings but eventually decided to go with the simple pattern we used to teach at the Make Lounge.

I made most of the quilt in an afternoon and finished it a few days later by hand stitching the yellow edges. Here's the finished result:


Baby knits - part 2

My latest baby knits have reached their destination safely so I can finally blog about them. 

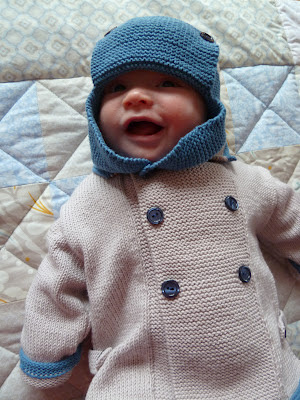
Little Liam was born in Quebec at the end of February and I'd promised his mum I would handcraft him something with love. 

I came across this cute pattern by Sublime for a little motoring coat and matching hat and I just couldn't resist. 

I decided to knit it in Debbie Bliss Eco Baby, an organic cotton yarn. I had to fiddle somewhat to get the tension right but eventually found that by dropping 2 needle sizes I could get the right stitch count. This meant I had to go and buy size 2.5mm needles, as I only had double pointed ones in that size. I usually prefer knitting on wooden or bamboo needles but when knitting with very fine needles, I have now learnt that you're better off with metallic ones or, if you insist on wood, then go for circular ones. The straight bamboo needles were just too soft and ended up bending after the first few rows. With the circular needles, the needle part is that much shorter that it doesn't really have the opportunity to bend. 

This pattern is really easy but it's knitted in many individual parts so if like me, you don't particularly like stitching your knitting together, it's a bit of a bummer. I stayed up most of the night to finish the stitching, I just got so fed up with it, I had to get it out of the way! But the final result looked great. The yarn is really soft and the pebble colour gives it a bit of of a vintage feel. What do you think?


 Little Liam certainly seems to like it, even if it's still a few sizes too big for him!